from fastai.vision.all import *
dPath = Path("../data/mnist_png/")11 Modeling pipeline with fastai’s Mid-Level API (draft)
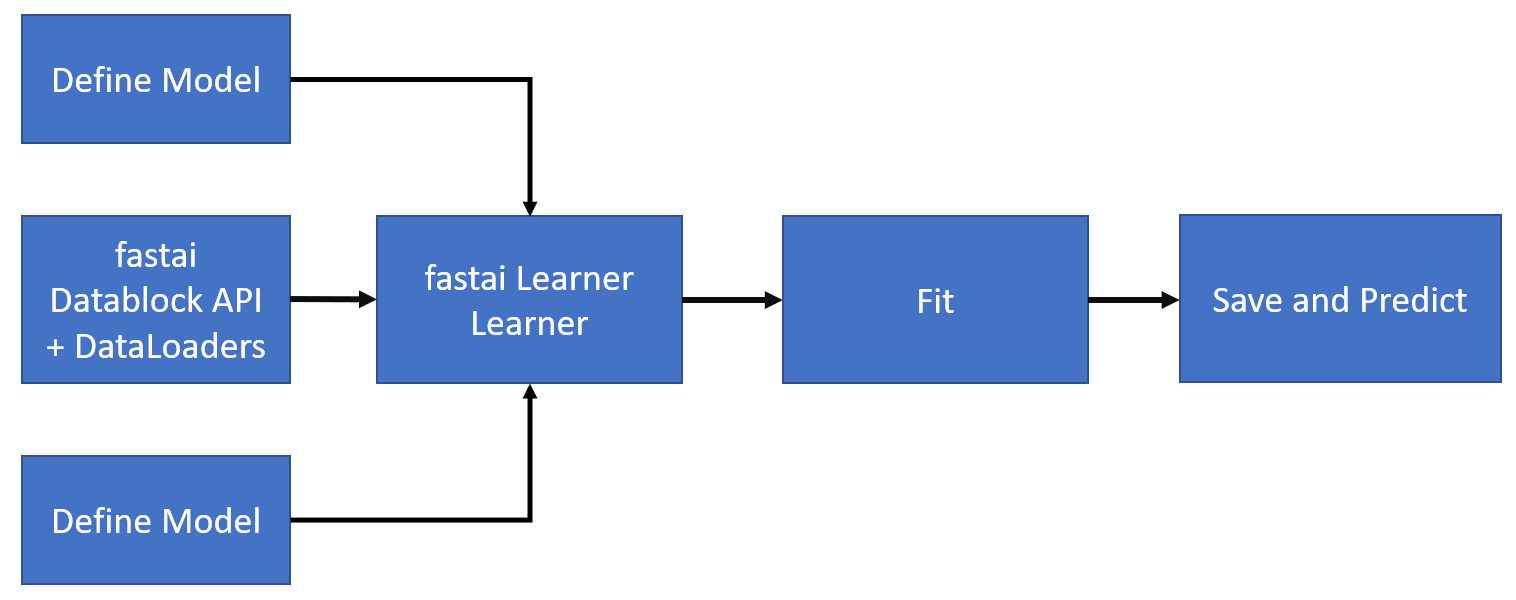
This chapter will cover the process of training a model for multi-class classification on MNIST data using the fastai mid-level API. The image below illustrates the general steps involved in using the mid-level API:
11.1 Download data
Download instruction can be found in Downloading Data from Kaggle section of Modeling pipeline with Neural Networks chapter.
11.2 Creating a dataloader using DataBlock API
Note
For better understanding of datablock API, I highly recommend the fastai Data block tutorial.
To begin, we will import the fastai.vision module, as we are working with image classification tasks in this case.
Important
It is generally not recommended to use import * in production scenarios. Instead, it is advisable to use precise imports. For instance, the function ImageDataLoaders is located in the fastai.vision module, specifically in the data.py file. Therefore, the recommended import statement would be:
from fastai.vision.data import ImageDataLoadersThis approach ensures that only the required function is imported, which is considered a good coding practice in production environments.
For simplicity, we will stick with import * notion.
Let’s review the fastai Datablock API before proceeding to create our dataloaders.
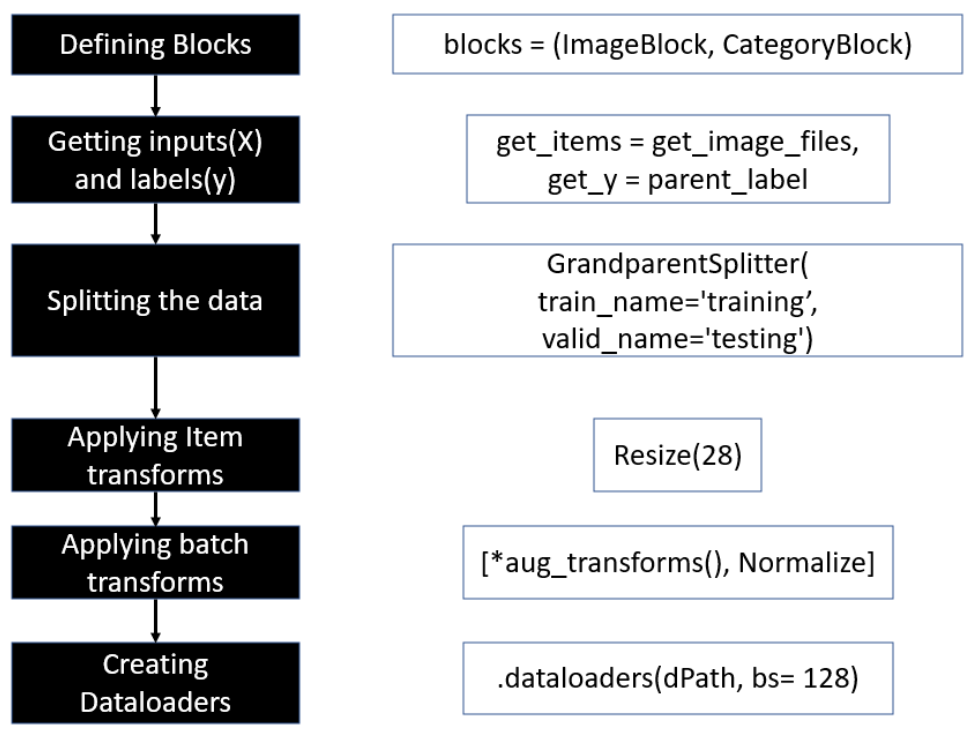
The fastai DataBlock API is a powerful tool for preparing data for deep learning models. The high level process of using this API involves the following steps:
Defining blocks: The first step is to define the blocks that make up your data. For example, you may have an image dataset where each image is associated with a label. In this case, you would define an
ImageBlockfor the images and aCategoryBlockfor the labels.Getting inputs and labels: The next step is to get your inputs and labels into the appropriate format for the blocks you defined. This may involve loading images from disk, resizing them, and converting them to tensors. You may also need to preprocess your labels, for example, by converting them to numerical values.
Splitting the data: Once your data is in the appropriate format, you can split it into training, validation, and test sets. The datablock API provides convenient methods for doing this, such as using a random or stratified split. Refer to data transformations documentation for complete list of avaialble splitting options.
Applying item transforms: Before your data can be fed into a model, you may need to apply item transforms. These are transformations that are applied to each item in the dataset, such as random cropping or flipping. The datablock API allows you to specify these transforms using the
item_tfmsargument.Applying batch transforms: In addition to item transforms, you may want to apply transforms to batches of items. For example, you may want to normalize the pixel values across a batch of images. The datablock API allows you to specify batch transforms using the
batch_tfmsargument.Creating dataloaders: Finally, you can create dataloaders for your training, validation, and test sets using the
dataloadersmethod. These dataloaders will take care of loading your data in batches, applying transforms, and shuffling the data during training.
By following these steps, you can use the fastai datablock API to easily prepare your data for deep learning models.
Next, we will create ourfastai DataBlock object using the DataBlock API.
dataset = DataBlock(
                blocks = (ImageBlock(cls = PILImageBW), CategoryBlock),
                get_items = get_image_files,
                splitter = GrandparentSplitter(train_name='training', valid_name='testing'),
                get_y = parent_label,
                item_tfms = Resize(28),
                batch_tfms = None
            )

dls = dataset.dataloaders(dPath, bs=128)print(dls.vocab) ## Prints class labels
print(dls.c) ## Prints number of classes
dls.show_batch(max_n=24,figsize=(10,6)) ## Show sample data['0', '1', '2', '3', '4', '5', '6', '7', '8', '9']
10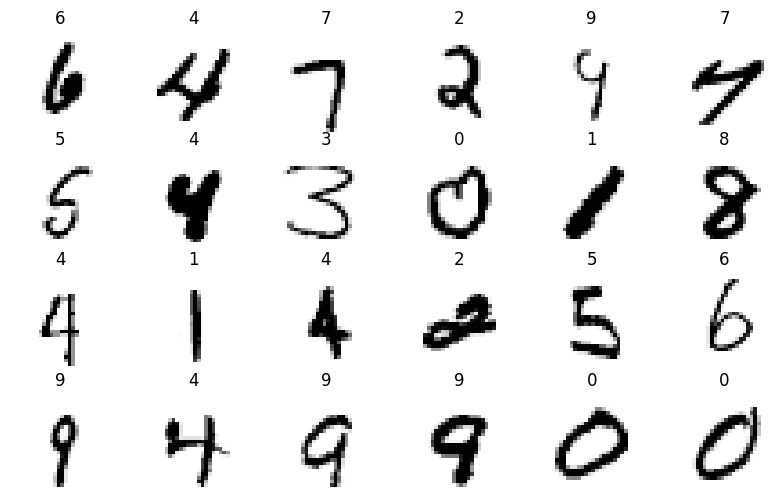
dls.one_batch()[0].shape, dls.one_batch()[1].shape(torch.Size([128, 1, 28, 28]), torch.Size([128]))class MLP(nn.Module):
def __init__(self, n_in, n_out):
super().__init__()
self.model = nn.Sequential(
nn.Linear(n_in, 256),
nn.ReLU(),
nn.Linear(256, 128),
nn.ReLU(),
nn.Linear(128, n_out)
)
def forward(self, x):
return self.model(x.view(-1,784))## Defining the learner
model = MLP(784, 10)
mlp_learner = Learner(
dls = dls,
model=model,
loss_func=F.cross_entropy,
model_dir=dPath/"models",
metrics=accuracy)## Finidng Ideal learning late
mlp_learner.lr_find()mlp_learner.fit_one_cycle(5,5e-2)