Originally, this was the blog post I wanted to write about but realized there is no single place for understanding Stable diffusion with code. Which is the reason I ended up creating the four-part series as a reference or pre-read material to understand this paper.
1 What is DiffEdit?
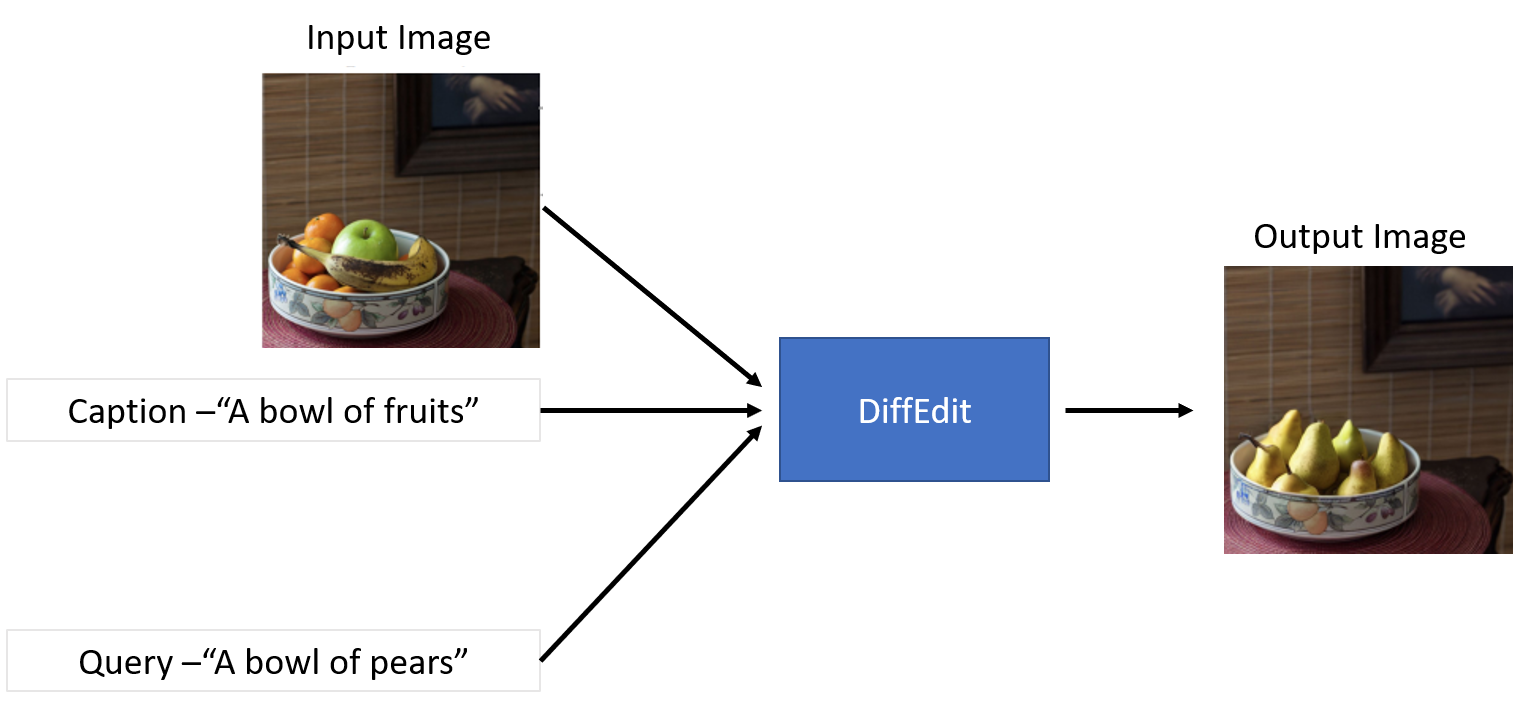
In simple terms, you can think of DiffEdit approach as a more controlled version of the Image to Image pipeline. DiffEdit takes three inputs- 1. An input image 2. Caption - Describing the input image 3. Target Query - Describe the new image you want to generate
and produce a modified version of the original image based on the query text. This process is particularly good if you want to make a slight tweak to the actual image without completely modifying it.
Fig. 1: Overview of Diff Edit.
As we can see from the image above only the fruits parts of the image were replaced with pears. Pretty amazing results!
The way the authors explain they achieve it is by introducing a mask generation module that determines which part of the image should be edited and then only perform text-based diffusion conditioning on the masked part.
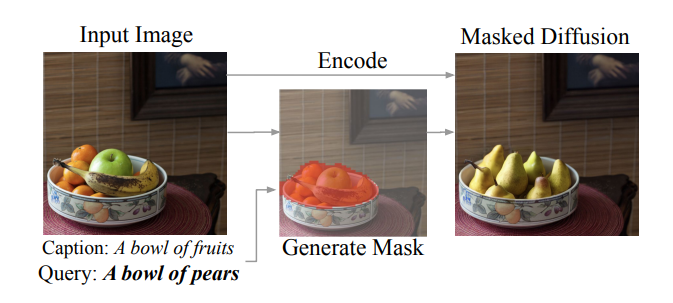
Fig. 2: From the paper DiffEdit. An approach to change an input image by providing caption text and new text.
As we can see from the image above taken from the paper, the authors create a mask from the input image which accurately determines the part of the image where fruits are present and generate a mask (shown in Orange) and then perform masked diffusion to replace fruits with pears. Reading further the authors provide a good visual representation of the whole DiffEdit process.
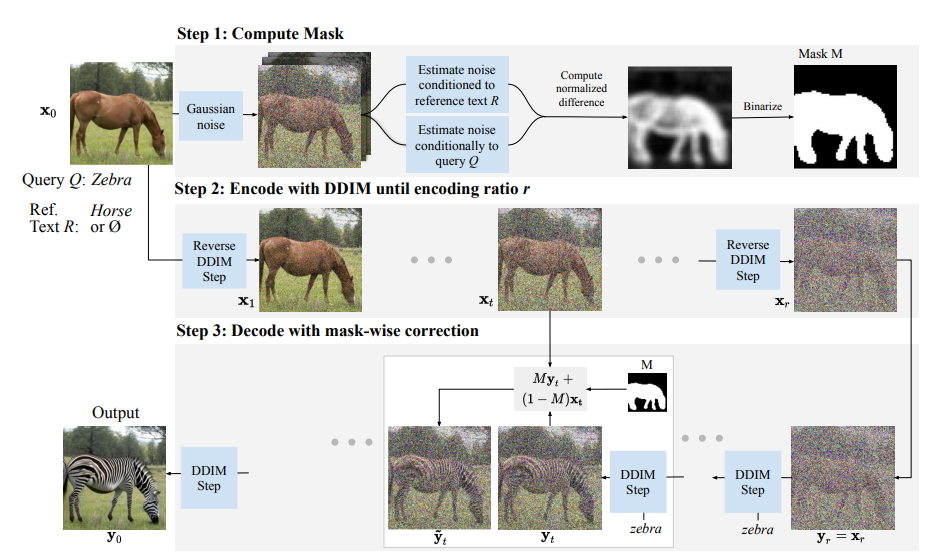
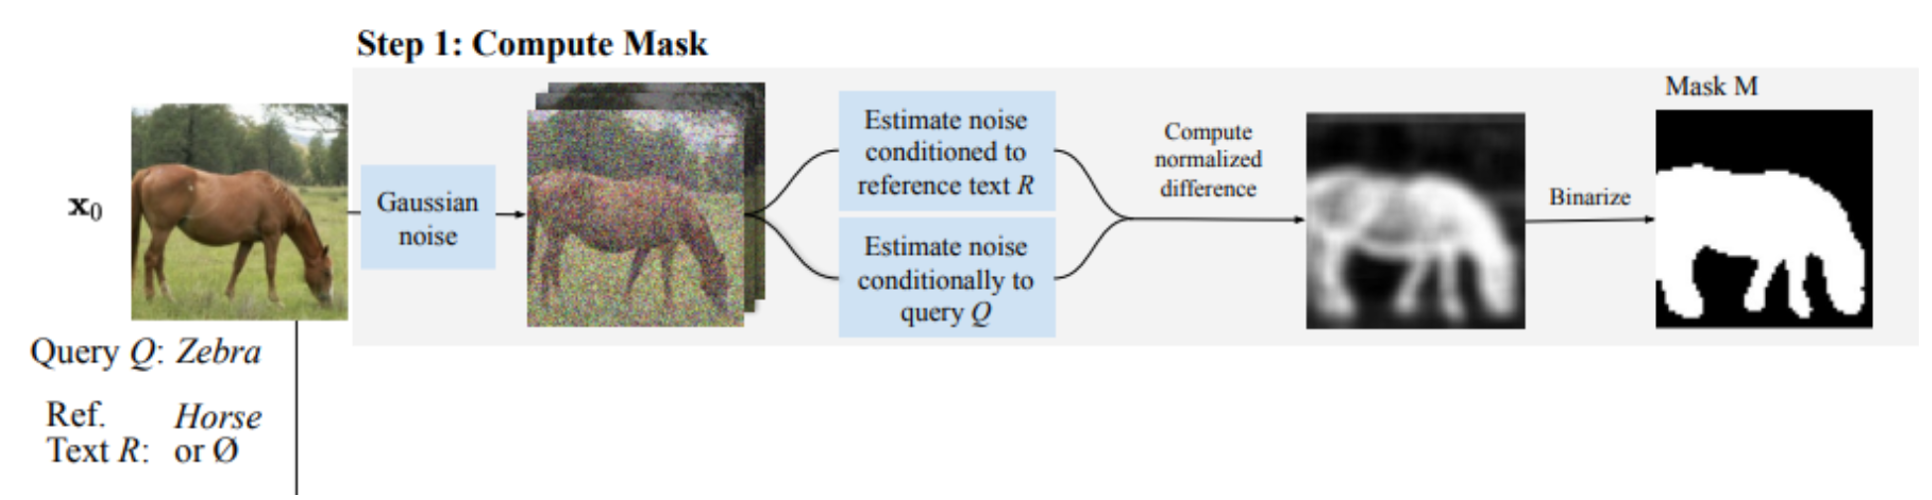
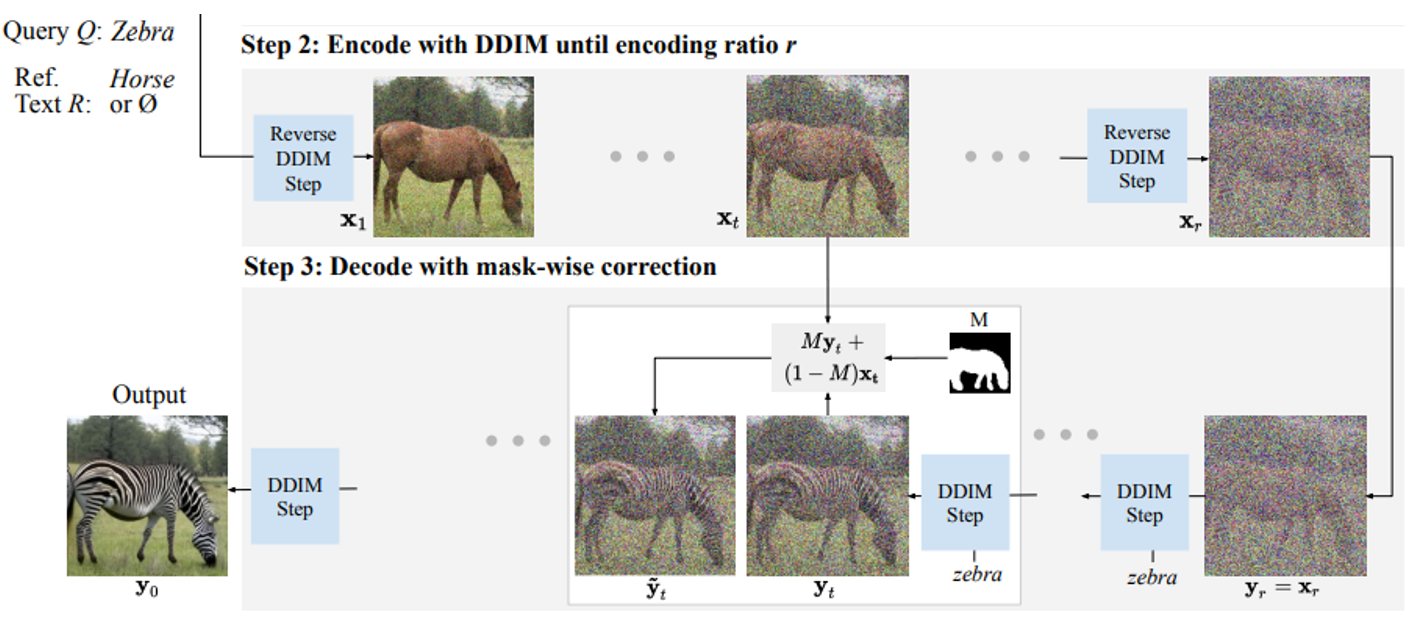
As I was reading this paper, it seems generating the masking is the most important step and the rest is just textual conditioning using the diffusion process. The conditioning of an image using the mask is a similar idea implemented in Hugging face In-Paint Pipeline. As suggested by the authors, “there are three steps to the DiffEdit process - Step 1: Add noise to the input image, and denoise it: once conditioned on the query text, and once conditioned on a reference text (or unconditionally). We derive a mask based on the difference in the denoising results. Step2: we encode the input image with DDIM, to estimate the latents corresponding to the input image Step3: we perform DDIM decoding conditioned on the text query, using the inferred mask to replace the background with pixel values coming from the encoding process at the corresponding timestep”1
In the next sections, we will start implementing these ideas into actual code.
Let’s start by importing the required libraries and helper functions. All of this was already used and explained in the previous part 2 and part 3 of the stable diffusion series.
Code
import torch, logging## disable warningslogging.disable(logging.WARNING) ## Imaging libraryfrom PIL import Imagefrom torchvision import transforms as tfms## Basic librariesfrom fastdownload import FastDownloadimport numpy as npfrom tqdm.auto import tqdmimport matplotlib.pyplot as plt%matplotlib inlinefrom IPython.display import displayimport shutilimport os## For video displayfrom IPython.display import HTMLfrom base64 import b64encode## Import the CLIP artifacts from transformers import CLIPTextModel, CLIPTokenizerfrom diffusers import AutoencoderKL, UNet2DConditionModel, DDIMScheduler## Helper functionsdef load_artifacts():''' A function to load all diffusion artifacts ''' vae = AutoencoderKL.from_pretrained("CompVis/stable-diffusion-v1-4", subfolder="vae", torch_dtype=torch.float16).to("cuda") unet = UNet2DConditionModel.from_pretrained("CompVis/stable-diffusion-v1-4", subfolder="unet", torch_dtype=torch.float16).to("cuda") tokenizer = CLIPTokenizer.from_pretrained("openai/clip-vit-large-patch14", torch_dtype=torch.float16) text_encoder = CLIPTextModel.from_pretrained("openai/clip-vit-large-patch14", torch_dtype=torch.float16).to("cuda") scheduler = DDIMScheduler(beta_start=0.00085, beta_end=0.012, beta_schedule="scaled_linear", clip_sample=False, set_alpha_to_one=False) return vae, unet, tokenizer, text_encoder, schedulerdef load_image(p):''' Function to load images from a defined path '''return Image.open(p).convert('RGB').resize((512,512))def pil_to_latents(image):''' Function to convert image to latents ''' init_image = tfms.ToTensor()(image).unsqueeze(0) *2.0-1.0 init_image = init_image.to(device="cuda", dtype=torch.float16) init_latent_dist = vae.encode(init_image).latent_dist.sample() *0.18215return init_latent_distdef latents_to_pil(latents):''' Function to convert latents to images ''' latents = (1/0.18215) * latentswith torch.no_grad(): image = vae.decode(latents).sample image = (image /2+0.5).clamp(0, 1) image = image.detach().cpu().permute(0, 2, 3, 1).numpy() images = (image *255).round().astype("uint8") pil_images = [Image.fromarray(image) for image in images]return pil_imagesdef text_enc(prompts, maxlen=None):''' A function to take a texual promt and convert it into embeddings '''if maxlen isNone: maxlen = tokenizer.model_max_length inp = tokenizer(prompts, padding="max_length", max_length=maxlen, truncation=True, return_tensors="pt") return text_encoder(inp.input_ids.to("cuda"))[0].half()vae, unet, tokenizer, text_encoder, scheduler = load_artifacts()
Let’s also download an image which we will use for the code implementation process.
p = FastDownload().download('https://images.pexels.com/photos/1996333/pexels-photo-1996333.jpeg?cs=srgb&dl=pexels-helena-lopes-1996333.jpg&fm=jpg&_gl=1*1pc0nw8*_ga*OTk4MTI0MzE4LjE2NjY1NDQwMjE.*_ga_8JE65Q40S6*MTY2Njc1MjIwMC4yLjEuMTY2Njc1MjIwMS4wLjAuMA..')init_img = load_image(p)init_img
2 DiffEdit: Purist implementation
Let’s start by implementing the paper as closely as the authors suggested, hence the Purist implementation.
2.1 Mask Creation: First Step of the DiffEdit process
Fig. 4: Step 1 from the DiffEdit paper.
There is a more detailed explanation of Step 1 from the paper, here are the key parts mentioned - 1. Denoise image using different text conditioning, one using reference text and the other using query text, and take differences from the result. The idea is there are more changes in the different parts and not in the background of the image. 2. Repeat this differencing process 10 times 3. Average out these differences and binarize for mask
Note
The third step in mask creation (averaging and binarization) is not explained clearly in the paper and it took me a lot of experiments to get this right.
First, we will try to implement the paper exactly as it’s mentioned. We will modify the prompt_2_img_i2i function for this task to return latents instead of rescaled and decoded de-noised images.
def prompt_2_img_i2i(prompts, init_img, neg_prompts=None, g=7.5, seed=100, strength =0.8, steps=50, dim=512):""" Diffusion process to convert prompt to image """# Converting textual prompts to embedding text = text_enc(prompts) # Adding an unconditional prompt , helps in the generation processifnot neg_prompts: uncond = text_enc([""], text.shape[1])else: uncond = text_enc(neg_prompt, text.shape[1]) emb = torch.cat([uncond, text])# Setting the seedif seed: torch.manual_seed(seed)# Setting number of steps in scheduler scheduler.set_timesteps(steps)# Convert the seed image to latent init_latents = pil_to_latents(init_img)# Figuring initial time step based on strength init_timestep =int(steps * strength) timesteps = scheduler.timesteps[-init_timestep] timesteps = torch.tensor([timesteps], device="cuda")# Adding noise to the latents noise = torch.randn(init_latents.shape, generator=None, device="cuda", dtype=init_latents.dtype) init_latents = scheduler.add_noise(init_latents, noise, timesteps) latents = init_latents# Computing the timestep to start the diffusion loop t_start =max(steps - init_timestep, 0) timesteps = scheduler.timesteps[t_start:].to("cuda")# Iterating through defined stepsfor i,ts inenumerate(tqdm(timesteps)):# We need to scale the i/p latents to match the variance inp = scheduler.scale_model_input(torch.cat([latents] *2), ts)# Predicting noise residual using U-Netwith torch.no_grad(): u,t = unet(inp, ts, encoder_hidden_states=emb).sample.chunk(2)# Performing Guidance pred = u + g*(t-u)# Conditioning the latents#latents = scheduler.step(pred, ts, latents).pred_original_sample latents = scheduler.step(pred, ts, latents).prev_sample# Returning the latent representation to output an array of 4x64x64return latents.detach().cpu()
Next, we will make a create_mask function, which will take an initial image, reference prompt, and query prompt with the number of times we need to repeat the steps. In the paper, the author suggests that n=10 and a strength of 0.5 works well in their experimentation. Hence, the default for the function is adjusted to that. create_mask function performs the following steps - 1. Create two denoised latents, one conditioned on reference text and the second on query text, and take a difference of these latents 2. Repeat this step n times 3. Take an average of these differences and standardize 4. Pick a threshold of 0.5 to binarize and create a mask
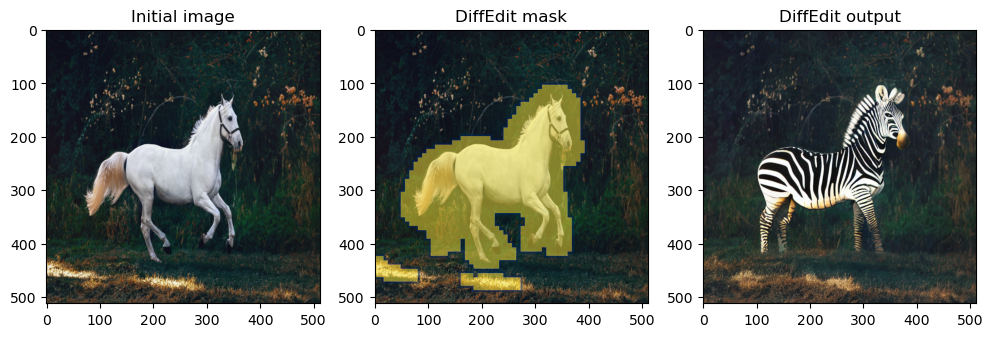
def create_mask(init_img, rp, qp, n=10, s=0.5):## Initialize a dictionary to save n iterations diff = {}## Repeating the difference process n timesfor idx inrange(n):## Creating denoised sample using reference / original text orig_noise = prompt_2_img_i2i(prompts=rp, init_img=init_img, strength=s, seed =100*idx)[0]## Creating denoised sample using query / target text query_noise = prompt_2_img_i2i(prompts=qp, init_img=init_img, strength=s, seed =100*idx)[0]## Taking the difference diff[idx] = (np.array(orig_noise)-np.array(query_noise))## Creating a mask placeholder mask = np.zeros_like(diff[0])## Taking an average of 10 iterationsfor idx inrange(n):## Note np.abs is a key step mask += np.abs(diff[idx]) ## Averaging multiple channels mask = mask.mean(0)## Normalizing mask = (mask - mask.mean()) / np.std(mask)## Binarizing and returning the mask objectreturn (mask >0).astype("uint8")mask = create_mask(init_img=init_img, rp=["a horse image"], qp=["a zebra image"], n=10)
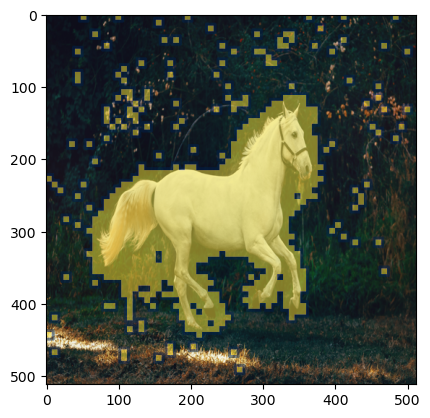
Let’s visualize the generated mask over the image.
Code
plt.imshow(np.array(init_img), cmap='gray') # I would add interpolation='none'plt.imshow( Image.fromarray(mask).resize((512,512)), ## Scaling the mask to original size cmap='cividis', alpha=0.5*(np.array(Image.fromarray(mask*255).resize((512,512))) >0) )
Fig. 5: Masking visualization over our horse image.
As we can see above, the mask produced covers the horse portion well which is what we want.
2.2 Masked Diffusion: Step 2 and 3 of DiffEdit paper.
Fig. 6: Step 2 and 3 from the DiffEdit paper.
Steps 2 and 3 need to be implemented in the same loop. Simply put author is saying to condition the latents based on reference text for the non-masked part and on query text for the masked part. Combine these two parts using this simple formula to create combined latents -
\[ \hat{y}_{t} = My_{t} + (1-M)x_{t} \]
def prompt_2_img_diffedit(rp, qp, init_img, mask, g=7.5, seed=100, strength =0.7, steps=70, dim=512):""" Diffusion process to convert prompt to image """# Converting textual prompts to embedding rtext = text_enc(rp) qtext = text_enc(qp)# Adding an unconditional prompt , helps in the generation process uncond = text_enc([""], rtext.shape[1]) emb = torch.cat([uncond, rtext, qtext])# Setting the seedif seed: torch.manual_seed(seed)# Setting number of steps in scheduler scheduler.set_timesteps(steps)# Convert the seed image to latent init_latents = pil_to_latents(init_img)# Figuring initial time step based on strength init_timestep =int(steps * strength) timesteps = scheduler.timesteps[-init_timestep] timesteps = torch.tensor([timesteps], device="cuda")# Adding noise to the latents noise = torch.randn(init_latents.shape, generator=None, device="cuda", dtype=init_latents.dtype) init_latents = scheduler.add_noise(init_latents, noise, timesteps) latents = init_latents# Computing the timestep to start the diffusion loop t_start =max(steps - init_timestep, 0) timesteps = scheduler.timesteps[t_start:].to("cuda")# Converting mask to torch tensor mask = torch.tensor(mask, dtype=unet.dtype).unsqueeze(0).unsqueeze(0).to("cuda")# Iterating through defined stepsfor i,ts inenumerate(tqdm(timesteps)):# We need to scale the i/p latents to match the variance inp = scheduler.scale_model_input(torch.cat([latents] *3), ts)# Predicting noise residual using U-Netwith torch.no_grad(): u, rt, qt = unet(inp, ts, encoder_hidden_states=emb).sample.chunk(3)# Performing Guidance rpred = u + g*(rt-u) qpred = u + g*(qt-u)# Conditioning the latents rlatents = scheduler.step(rpred, ts, latents).prev_sample qlatents = scheduler.step(qpred, ts, latents).prev_sample latents = mask*qlatents + (1-mask)*rlatents# Returning the latent representation to output an array of 4x64x64return latents_to_pil(latents)
Let’s create a simple function for the masking and diffusion process.
def diffEdit(init_img, rp , qp, g=7.5, seed=100, strength =0.7, steps=70, dim=512):## Step 1: Create mask mask = create_mask(init_img=init_img, rp=rp, qp=qp)## Step 2 and 3: Diffusion process using mask output = prompt_2_img_diffedit( rp = rp, qp=qp, init_img=init_img, mask = mask, g=g, seed=seed, strength =strength, steps=steps, dim=dim)return mask , output
Let’s also create a visualization function for DiffEdit showing the original input image, masked image, and final output image.
def plot_diffEdit(init_img, output, mask):## Plotting side by side fig, axs = plt.subplots(1, 3, figsize=(12, 6))## Visualizing initial image axs[0].imshow(init_img) axs[0].set_title(f"Initial image")## Visualizing initial image axs[2].imshow(output[0]) axs[2].set_title(f"DiffEdit output")## Visualizing the mask axs[1].imshow(np.array(init_img), cmap='gray') axs[1].imshow( Image.fromarray(mask).resize((512,512)), ## Scaling the mask to original size cmap='cividis', alpha=0.5*(np.array(Image.fromarray(mask*255).resize((512,512))) >0) ) axs[1].set_title(f"DiffEdit mask")
Let’s test this function on a few images.
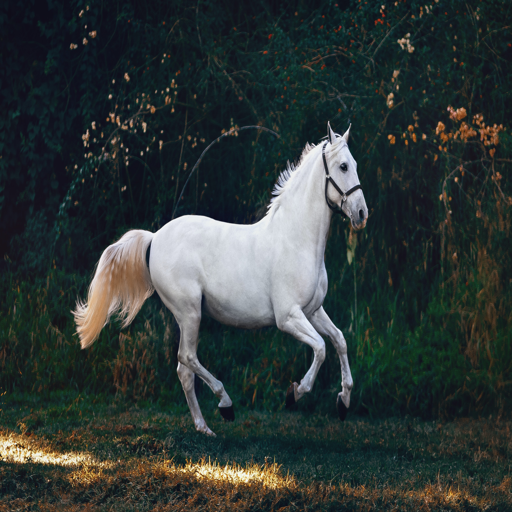
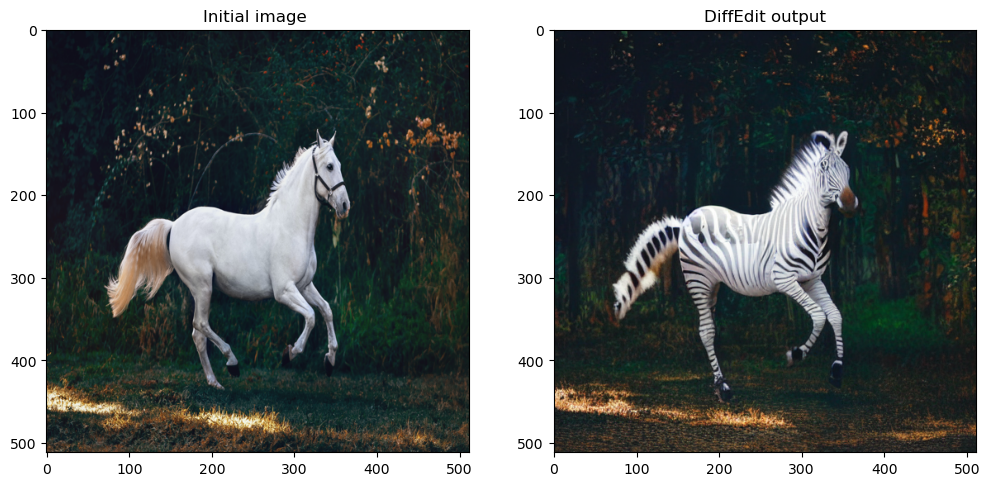
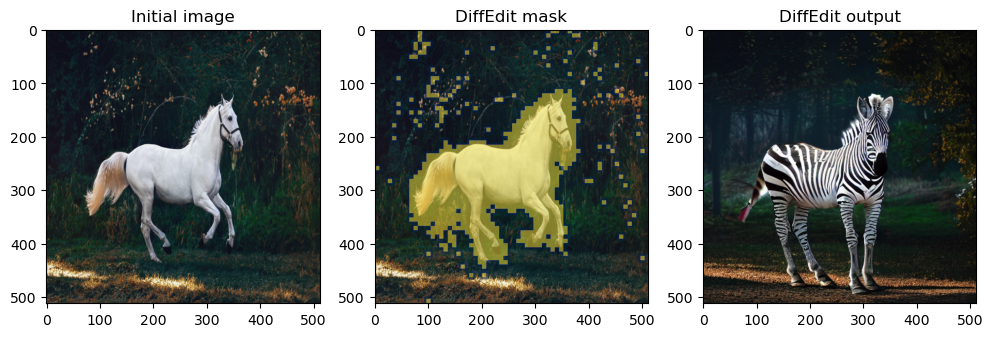
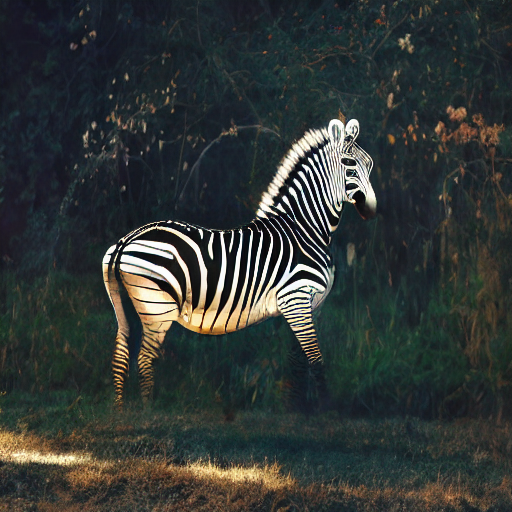
p = FastDownload().download('https://images.pexels.com/photos/1996333/pexels-photo-1996333.jpeg?cs=srgb&dl=pexels-helena-lopes-1996333.jpg&fm=jpg&_gl=1*1pc0nw8*_ga*OTk4MTI0MzE4LjE2NjY1NDQwMjE.*_ga_8JE65Q40S6*MTY2Njc1MjIwMC4yLjEuMTY2Njc1MjIwMS4wLjAuMA..')init_img = load_image(p)mask, output = diffEdit(init_img, rp = ["a horse image"], qp=["a zebra image"])plot_diffEdit(init_img, output, mask)
Fig. 8: Purist implementation output example
Perfect, let’s try another one.
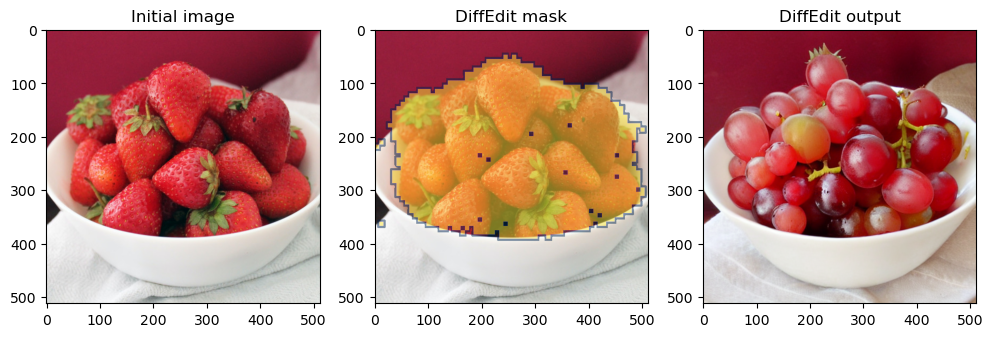
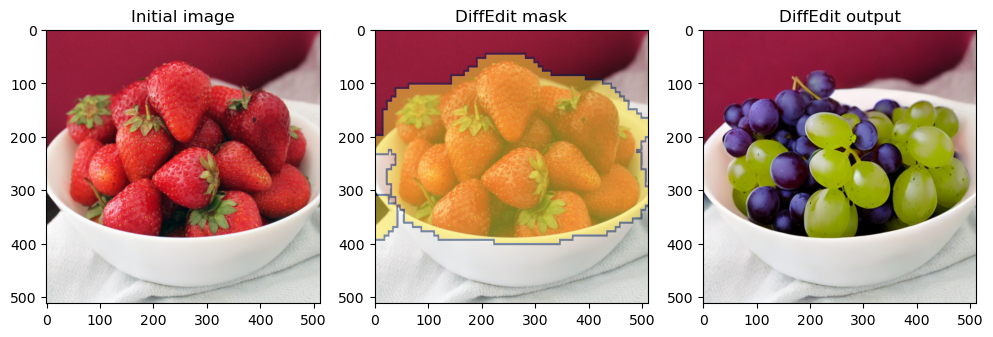
p = FastDownload().download('https://raw.githubusercontent.com/johnrobinsn/diffusion_experiments/main/images/bowloberries_scaled.jpg')init_img = load_image(p)mask, output = diffEdit(init_img, rp = ['Bowl of Strawberries'], qp=['Bowl of Grapes'])plot_diffEdit(init_img, output, mask)
Fig. 9: Purist implementation output example
3 FastDiffEdit: A faster DiffEdit implementation
Now we have seen the purist implementation, there are some improvements I suggest we can make to the original DiffEdit process in terms of speed and better results. Let’s call these improvements FastDiffEdit.
3.1 Mask Creation: Fast DiffEdit masking process
My biggest issue with the current way of doing masking is that it takes too much time(~50 sec on A4500 GPU). My take is we don’t need to run a full diffusion loop to denoise the image but just use the U-net prediction of the original sample in one shot and increase the repetition to 20 times. In this case, we can improve the computation from 10*25 = 250 steps to 20 steps (12x less loop). Let’s see if this works in practice.
def prompt_2_img_i2i_fast(prompts, init_img, g=7.5, seed=100, strength =0.5, steps=50, dim=512):""" Diffusion process to convert prompt to image """# Converting textual prompts to embedding text = text_enc(prompts) # Adding an unconditional prompt , helps in the generation process uncond = text_enc([""], text.shape[1]) emb = torch.cat([uncond, text])# Setting the seedif seed: torch.manual_seed(seed)# Setting number of steps in scheduler scheduler.set_timesteps(steps)# Convert the seed image to latent init_latents = pil_to_latents(init_img)# Figuring initial time step based on strength init_timestep =int(steps * strength) timesteps = scheduler.timesteps[-init_timestep] timesteps = torch.tensor([timesteps], device="cuda")# Adding noise to the latents noise = torch.randn(init_latents.shape, generator=None, device="cuda", dtype=init_latents.dtype) init_latents = scheduler.add_noise(init_latents, noise, timesteps) latents = init_latents# We need to scale the i/p latents to match the variance inp = scheduler.scale_model_input(torch.cat([latents] *2), timesteps)# Predicting noise residual using U-Netwith torch.no_grad(): u,t = unet(inp, timesteps, encoder_hidden_states=emb).sample.chunk(2)# Performing Guidance pred = u + g*(t-u)# Zero shot prediction latents = scheduler.step(pred, timesteps, latents).pred_original_sample# Returning the latent representation to output an array of 4x64x64return latents.detach().cpu()
Let’s create a new masking function that can take our prompt_2_img_i2i_fast function.
def create_mask_fast(init_img, rp, qp, n=20, s=0.5):## Initialize a dictionary to save n iterations diff = {}## Repeating the difference process n timesfor idx inrange(n):## Creating denoised sample using reference / original text orig_noise = prompt_2_img_i2i_fast(prompts=rp, init_img=init_img, strength=s, seed =100*idx)[0]## Creating denoised sample using query / target text query_noise = prompt_2_img_i2i_fast(prompts=qp, init_img=init_img, strength=s, seed =100*idx)[0]## Taking the difference diff[idx] = (np.array(orig_noise)-np.array(query_noise))## Creating a mask placeholder mask = np.zeros_like(diff[0])## Taking an average of 10 iterationsfor idx inrange(n):## Note np.abs is a key step mask += np.abs(diff[idx]) ## Averaging multiple channels mask = mask.mean(0)## Normalizing mask = (mask - mask.mean()) / np.std(mask)## Binarizing and returning the mask objectreturn (mask >0).astype("uint8")
Let’s see if this new masking function produces a good mask.
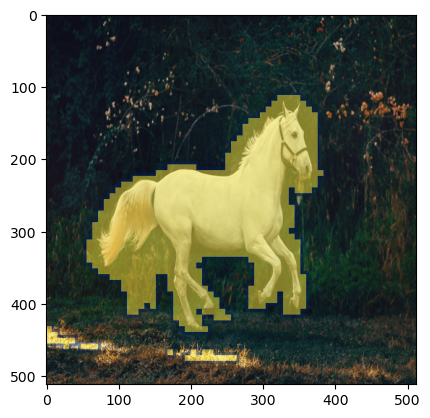
p = FastDownload().download('https://images.pexels.com/photos/1996333/pexels-photo-1996333.jpeg?cs=srgb&dl=pexels-helena-lopes-1996333.jpg&fm=jpg&_gl=1*1pc0nw8*_ga*OTk4MTI0MzE4LjE2NjY1NDQwMjE.*_ga_8JE65Q40S6*MTY2Njc1MjIwMC4yLjEuMTY2Njc1MjIwMS4wLjAuMA..')init_img = load_image(p)mask = create_mask_fast(init_img=init_img, rp=["a horse image"], qp=["a zebra image"], n=20)plt.imshow(np.array(init_img), cmap='gray') # I would add interpolation='none'plt.imshow( Image.fromarray(mask).resize((512,512)), ## Scaling the mask to original size cmap='cividis', alpha=0.5*(np.array(Image.fromarray(mask*255).resize((512,512))) >0) )
Fig. 10: FastDiffEdit masking visualization over our horse image.
As we can see above the masking is improved and compute time has reduced from ~50 seconds to ~10 secs on my machine(5x improvement!).
Let’s improve our masking by adding a cv2 trick. This will just smooth out the masking a little bit more.
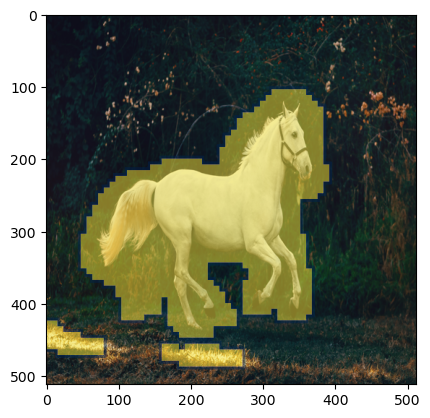
mask = improve_mask(mask)plt.imshow(np.array(init_img), cmap='gray') # I would add interpolation='none'plt.imshow( Image.fromarray(mask).resize((512,512)), ## Scaling the mask to original size cmap='cividis', alpha=0.5*(np.array(Image.fromarray(mask*255).resize((512,512))) >0) )
Fig. 11: Improved FastDiffEdit masking visualization over our horse image with cv2 Gaussian blur trick.
As we can see above the masking has become a bit more smooth and covers more area.
3.2 Masked Diffusion: Replace with 🤗 inpaint pipeline
So, instead of using our function to perform the masked diffusion, there is a special pipeline in 🤗 diffusers library called inpaint pipeline. Which takes the query prompt, initial image, and generated mask to generate the output image. Let’s start by loading in the inpaint pipeline.
from diffusers import StableDiffusionInpaintPipelinepipe = StableDiffusionInpaintPipeline.from_pretrained("runwayml/stable-diffusion-inpainting", revision="fp16", torch_dtype=torch.float16,).to("cuda")
Let’s use the inpaint pipeline with our generated mask and image.
p = FastDownload().download('https://images.pexels.com/photos/1996333/pexels-photo-1996333.jpeg?cs=srgb&dl=pexels-helena-lopes-1996333.jpg&fm=jpg&_gl=1*1pc0nw8*_ga*OTk4MTI0MzE4LjE2NjY1NDQwMjE.*_ga_8JE65Q40S6*MTY2Njc1MjIwMC4yLjEuMTY2Njc1MjIwMS4wLjAuMA..')init_img = load_image(p)mask, output = fastDiffEdit(init_img, rp = ["a horse image"], qp=["a zebra image"])plot_diffEdit(init_img, output, mask)
Fig. 13: FastDiffEdit output example
Perfect, let’s try another one.
p = FastDownload().download('https://raw.githubusercontent.com/johnrobinsn/diffusion_experiments/main/images/bowloberries_scaled.jpg')init_img = load_image(p)mask, output = fastDiffEdit(init_img, rp = ['Bowl of Strawberries'], qp=['Bowl of Grapes'])plot_diffEdit(init_img, output, mask)
Fig. 14: FastDiffEdit output example
4 Conclusion
In this post, we implemented the DiffEdit paper as the author mentioned and then we proposed improvements to the method to create FastDiffEdit which speeds up computation times up to 5 times.
I hope you enjoyed reading it, and feel free to use my code and try it out for generating your images. Also, if there is any feedback on the code or just the blog post, feel free to reach out on LinkedIn or email me at aayushmnit@gmail.com.